
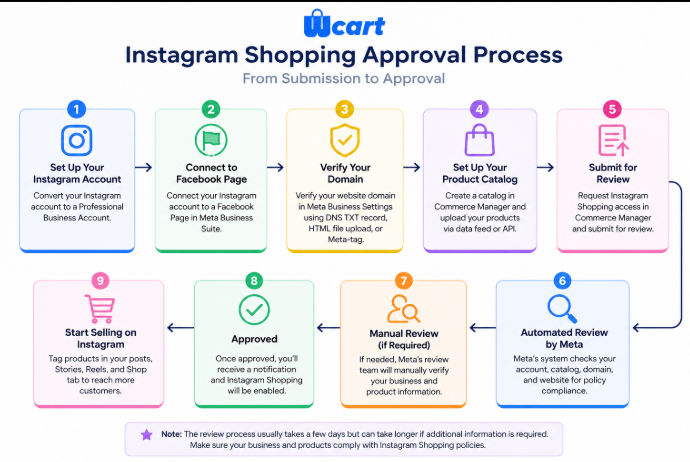
To set up Instagram Shopping, convert your account to a Business profile, link it to a Facebook Page, and verify your domain in Meta Business Manager. Next, upload your product catalog via a data feed or API, and submit your account for review in Commerce Manager to enable product tagging.
Key Takeaways
- Domain Ownership is Mandatory: Meta requires a fully verified, independent domain to approve your shop, making self-hosted setups highly advantageous.
- Catalog Accuracy Prevents Bans: Real-time or scheduled feed synchronization prevents mismatched pricing and out-of-stock policy violations.
- On-Site Checkout Retains Data: Redirecting users to your own storefront preserves your customer relationships and avoids third-party transaction fees.
- Visual Merchandising Drives Discovery: Curating custom collections and tagging products in Reels yields far higher engagement than static posts.
Why Do So Many Brands Struggle With Instagram Shopping Approvals?
Many merchants spend days preparing their social profiles, only to face immediate rejection when submitting their store to Meta. The disappointment of receiving an automated rejection email from Meta Commerce Manager is a common hurdle for growing brands.
The primary reason for these setbacks lies in Meta’s Commerce Eligibility Requirements. Meta enforces strict policies to protect users from fraudulent storefronts, low-quality products, and poor post-purchase experiences. If your online store does not clearly demonstrate absolute ownership of your brand, your inventory, and your domain, the automated review systems will flag your account.
A frequent point of failure is domain verification. If you run your business on a basic website builder or a shared subdomain, Meta often rejects the application. Automated review bots look for a dedicated, secure domain name that matches your business entity. When you use a closed SaaS platform, you are often subject to shared IP ranges or rigid URL structures that complicate this verification process.
Additionally, catalog discrepancies trigger immediate rejections. If the price, description, or availability of an item in your Instagram catalog differs from the actual landing page on your website, Meta flags this as a policy violation. This mismatch frequently happens when brands rely on slow, third-party sync plugins that fail to update inventory in real time.
For brands looking to establish a secure, long-term presence on social channels, using a self-hosted, headless-ready platforms offers a distinct advantage. Because you own the entire server environment and the database, you can generate clean, direct product feeds that sync perfectly with Meta’s requirements, avoiding the API bottlenecks and rate limits common with closed SaaS platforms.
What Are the Core Prerequisites Before You Begin Setup?
Before you attempt to link your inventory to Instagram, you must establish a solid administrative foundation. Skipping any of these foundational steps will delay your approval or prevent you from accessing advanced commerce features.
1. Convert to an Instagram Professional Account
- You cannot sell products using a personal Instagram profile. You must convert your account to either a Creator or a Business profile. For ecommerce brands, a Business Profile is highly recommended because it offers superior integration options with Meta Business Suite and allows for direct linking to third-party inventory managers.
- To switch, navigate to your Instagram profile settings, select “Account Type and Tools,” and choose “Switch to Professional Account.” Select the category that best describes your retail niche.
2. Establish a Meta Business Manager Account
- Meta Business Manager (now part of Meta Business Suite) is the central control panel for your social commerce operations. It houses your Facebook Page, your Instagram Professional account, your Meta Pixel, and your product catalogs.
- If you do not have a Business Manager account, you must create one. Avoid linking your business assets to a personal Facebook profile; keeping them within a dedicated Business Manager account ensures security and allows you to delegate access to team members or agencies safely.
3. Connect Your Instagram Profile to Your Facebook Page
Even if you do not plan to actively market on Facebook, Meta’s backend architecture requires every Instagram Shop to be associated with a Facebook Page.
- Open your Facebook Page settings.
- Navigate to “Linked Accounts.”
- Select “Instagram” and follow the prompts to log in and connect your profile.
4. Verify Your Domain Ownership
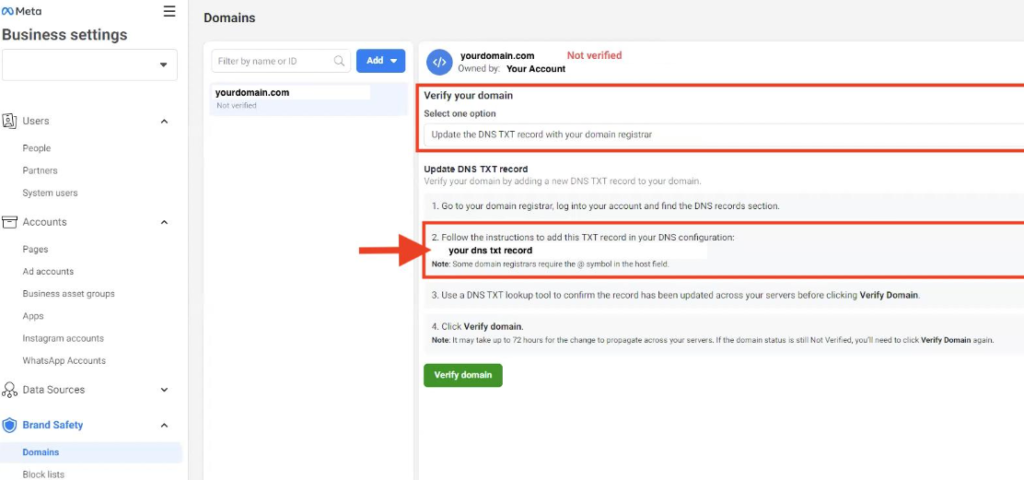
This is the most critical technical step. Meta must confirm that you own the website where you send shoppers to complete their purchases. To verify your domain:
- Go to Meta Business Settings.
- Under “Brand Safety and Suitability,” select “Domains.”
- Click “Add” and enter your root domain (e.g.,
yourbrand.com). - Choose one of the three verification methods: DNS TXT record configuration, HTML file upload to your root directory, or Meta-tag injection into your HTML head section.
Self-hosted platforms like Wcart make the HTML file upload method incredibly straightforward. Unlike closed platforms that restrict access to your root directory, a self-hosted setup allows you to upload the verification file directly to your server via FTP or your admin dashboard, securing instant verification.
How Do You Sync Your Product Catalog to Meta Business Manager?
Your product catalog is the database that feeds your Instagram Shop. It contains all the essential details about your inventory: titles, descriptions, pricing, images, and direct checkout links. There are three primary methods to sync this data, and choosing the right one depends heavily on your ecommerce platform.
| Sync Method | Pros | Cons | Best For |
|---|---|---|---|
| Manual Upload | Simple, no technical setup required | High maintenance, prone to human error, does not auto-update | Stores with fewer than ten static products |
| Data Feed (XML/CSV) | Highly reliable, automated, works across all platforms | Requires scheduled server cron jobs to update | Mid-to-large catalogs on self-hosted platforms |
| Commerce API Sync | Real-time updates, instant inventory adjustments | Subject to platform API rate limits and app failures | Enterprise brands using advanced headless setups |
Setting Up a Scheduled Data Feed
For most growing brands, a scheduled data feed (often in XML or CSV format) offers the perfect balance of automation and reliability. Instead of manually entering products, your ecommerce platform generates a dynamic URL that Meta’s servers read at scheduled intervals (e.g., every hour or daily).
To set up a data feed in Meta Commerce Manager:
1. Go to Commerce Manager and select your Business Account.
2. Click on Catalogs and select Data Sources.
3. Choose Add Items, then select Data Feed.
4. Choose Scheduled Feed and enter the feed URL generated by your ecommerce platform.
5. Set your update schedule. If you have high inventory turnover, set the sync to occur hourly.
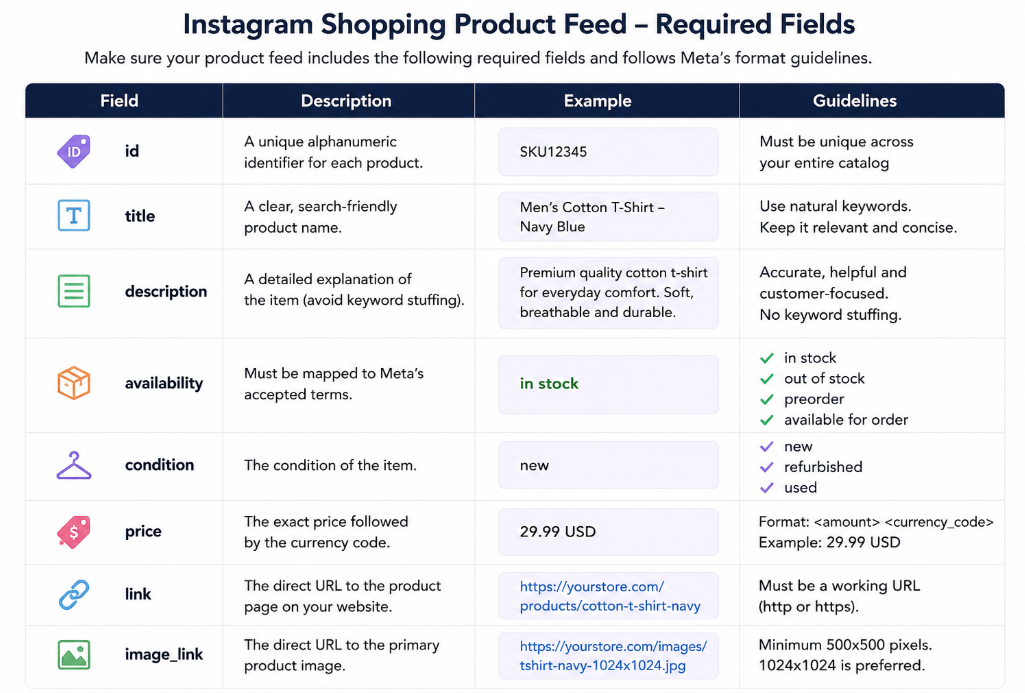
When configuring your feed, ensure your platform exports all mandatory Meta schema fields:
If you are using a platform like Shopify or BigCommerce, you are often forced to use their native channel apps, which can occasionally disconnect or suffer from API sync delays during high-traffic sales events.
In contrast, headless-ready systems gives you direct database access. This allows you to generate raw XML feeds directly from your server. Because there are no intermediary SaaS API layers to fail, your catalog updates are incredibly stable, ensuring that your Instagram audience never sees outdated pricing or out-of-stock items.
How Do You Submit Your Account for Review and Handle Rejections?
Once your Facebook Page is connected, your domain is verified, and your catalog is fully populated, you are ready to submit your account for official review.
Submitting the Review Request
- Open the Instagram app on your mobile device and navigate to your profile settings.
- Tap on Creator or Business (depending on your profile type).
- Select Set Up Instagram Shopping.
- Follow the on-screen prompts to select your verified domain and link your uploaded product catalog.
- Submit the application.
The review process is partially automated and partially manual. It typically takes anywhere from a few hours to several business days. During this window, Meta’s systems will crawl your website to ensure it complies with their merchant policies.
What Reviewers Look For On Your Website
To maximize your chances of immediate approval, ensure your website features the following trust signals:
- Clear Refund and Return Policies: You must have a dedicated page outlining how customers can return items and receive refunds.
- Accessible Contact Information: A physical address, phone number, or clear contact form must be easily accessible.
- Secure Checkout: Your entire site, especially the checkout flow, must be secured with an active SSL certificate (HTTPS).
- No Broken Links: Ensure all product pages, category pages, and footer links function perfectly.
Troubleshooting Rejections
If your application is rejected, do not panic. Meta provides a path to appeal.
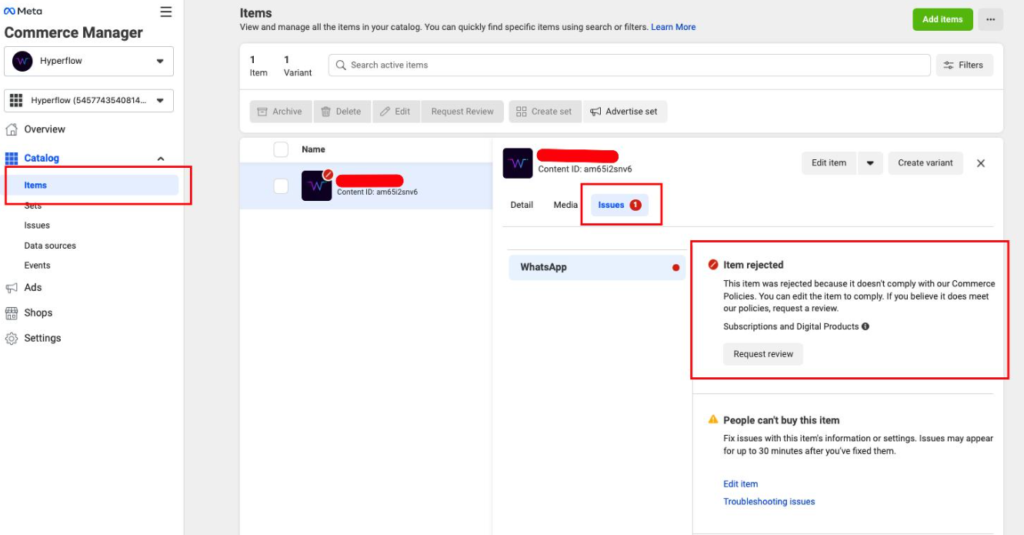
First, navigate to the Issues tab inside Meta Commerce Manager. Here, Meta will list the specific policy violations that triggered the rejection. Common issues include “Lack of Domain Ownership” or “Product Policy Violations” (often triggered by selling restricted items like supplements, digital goods, or certain cosmetics).
Once you have resolved the underlying issue such as fixing a broken link or updating your privacy policy—you can click the Request Review button in Commerce Manager. Avoid submitting multiple appeals without making changes to your site, as this can lead to a permanent ban of your commerce account.
How Can You Optimize Your Instagram Storefront for Maximum Conversions?
Getting approved is only the beginning. To turn your profile into a highly profitable sales channel, you must actively merchandise your Instagram Shop just as you would a physical boutique.
1. Master the Art of Product Tagging
Product tags are the core utility of Instagram Shopping. They allow users to tap on an image or video and instantly see the product name and price, with a direct link to purchase.
- In Feed Posts: Tag up to five products per single-image post, or up to twenty products in a carousel post. Avoid cluttering a single image with too many tags; space them out naturally across the item locations.
- In Stories: Use the dedicated Product Link sticker. This is highly effective for limited-time offers or daily highlights.
- In Reels: Reels offer incredible organic reach. Tagging products in your short-form videos allows viewers who discover your content via the Explore tab to shop your look instantly.
2. Curate Themed Collections
Do not expect users to scroll endlessly through your entire catalog. Use Collections to group your products into seasonal, thematic, or promotional categories.
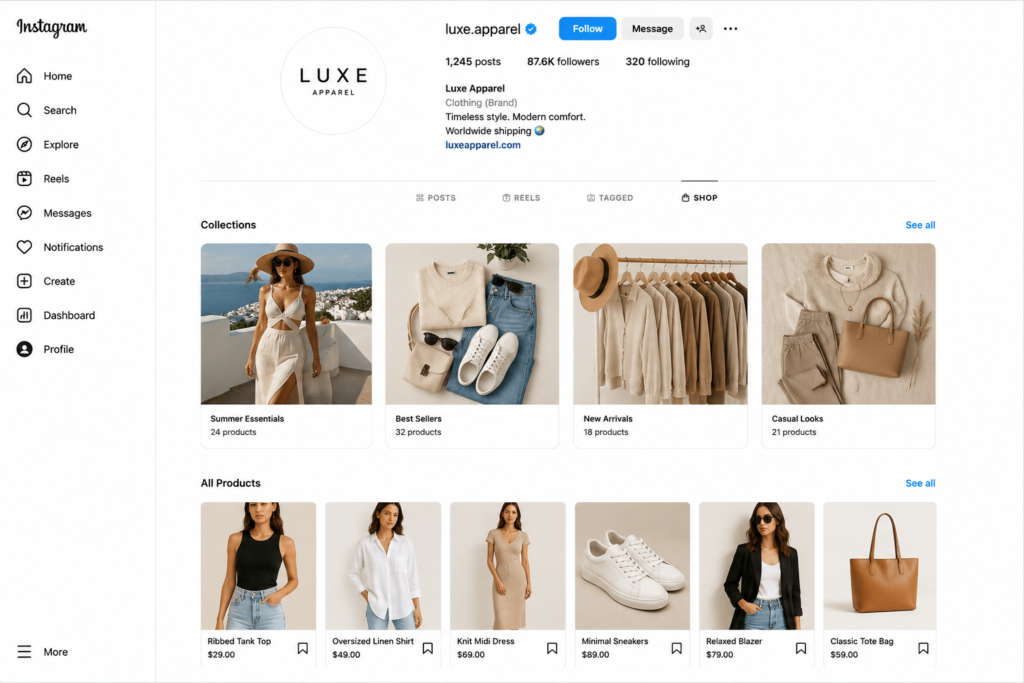
For example, you can create collections like “Best Sellers,” “Holiday Gift Guide,” or “New Arrivals.” This structured navigation mimics the user experience of a well-designed online store, helping shoppers find what they want with minimal taps.
3. Leverage Social Proof and User-Generated Content
Consumers trust real people far more than polished studio photography. Encourage your customers to share photos of your products and tag your brand.
Once you receive permission, you can feature these customer photos on your profile and tag the corresponding products directly. Integrating user-generated content campaigns into your social commerce strategy builds immediate trust and significantly increases conversion rates.
4. Optimize Product Detail Pages (PDPs) within Instagram
When a user taps a product tag, they are taken to an in-app Product Detail Page. To optimize this space:
Use high-resolution, lifestyle imagery as the primary photo.
Keep descriptions concise and benefit-driven, focusing on the value proposition in the first two lines before the “Read More” break.
* Ensure your size guides or product variants are clearly stated.
How Does Instagram Checkout Compare to Redirecting to Your Own Website?
When setting up your shop, you must choose how users will complete their purchases. Meta offers two primary pathways: Checkout on Instagram (native checkout) or Redirect to Website. This decision has profound implications for your profit margins, customer relationships, and operational control.
Native Instagram Checkout
With native checkout, the entire transaction occurs within the Instagram app. Meta securely stores the customer’s payment details, allowing them to buy with a single tap.
- The Pros: This method offers lower friction compared to external redirects. Users do not have to wait for an external website to load or input their credit card details again, which can improve conversion rates.
- The Cons: You lose direct access to critical customer data. Meta restricts the amount of customer information shared with you, making it difficult to build a direct relationship. Additionally, Meta charges transaction fees on native purchases, which can reduce your margins. You also have limited ability to offer custom upsells, cross-sells, or branded post-purchase tracking.
Redirecting to Your Own Storefront
With this method, when a user taps “View on Website,” an in-app browser opens, directing them to the product page on your online store to complete the purchase.
- The Pros: You retain full ownership of the customer relationship. You capture their email, marketing consent, and behavioral data, enabling personalized follow-up campaigns. You also avoid third-party transaction fees and maintain complete control over the checkout experience, including upsells and branding.
- The Cons: The additional step of redirecting users outside Instagram may slightly increase friction, potentially leading to higher cart abandonment rates.
For most brands, redirecting to their own storefront is the more strategic choice. While it requires optimizing your website for mobile speed and usability, the long-term benefits of owning your customer data and relationships far outweigh the minor convenience of native checkout.
Ready to Transform Your Instagram Profile into a High-Converting Storefront?
Take your Instagram shopping setup to the next level with headless commerce platform, designed to seamlessly integrate with your social media presence. Start selling smarter today and unlock the full potential of your online store.

























Leave a Reply